What is Microsoft Booking?
Microsoft Booking is an appointment scheduling and booking software offered by Microsoft. It is designed to help businesses manage and streamline their appointment scheduling processes. With Microsoft Booking, customers can easily schedule and manage appointments with a business or service provider online.
Features
Online booking: you can view available time slots and book appointments directly through a customizable online booking page. This eliminates the need for phone calls or emails to schedule appointments.
Calendar integration: Microsoft Booking integrates with the company’s calendar system, such as Microsoft Outlook. This ensures that appointments are automatically synced and prevents double bookings.
Reminders and notifications: Automated reminders and notifications can be sent to customers. This helps reduce no-shows. It also keeps them informed of upcoming appointments.
Customization: You can change your Booking Page with your logo.
Multi-person management: Microsoft Booking supports bookings for multiple people by providing individual schedules and availability. You can select your preferred person when booking appointments.
Mobile app: A mobile app is available.
Requirements
- Microsoft 365 subscription: A3, A5, E1, E3, E5, F1, F3, Office 365 operated by 21Vianet.
- Microsoft 365: A3, A5, E3, E5, F1, F3, Business Basic, Business Standard, Business Premium.
- Bookings are not available as a standalone app. Outlook Web App or Outlook on the web must be enabled to use Bookings, as it stores data in Outlook.
- Supported browsers: Microsoft Booking is compatible with modern web browsers, including Microsoft Edge, Google Chrome, Safari, and Mozilla Firefox.
- Calendar integration: Requires an active calendar linked to your Microsoft 365 account to sync and manage appointments.
- Admin access: To set up and arrange Microsoft Booking for your organization, you need administrative access. This access must be to your Microsoft 365 account. Administrative privileges are needed to allow and manage Microsoft Booking settings.
- Internet connectivity.
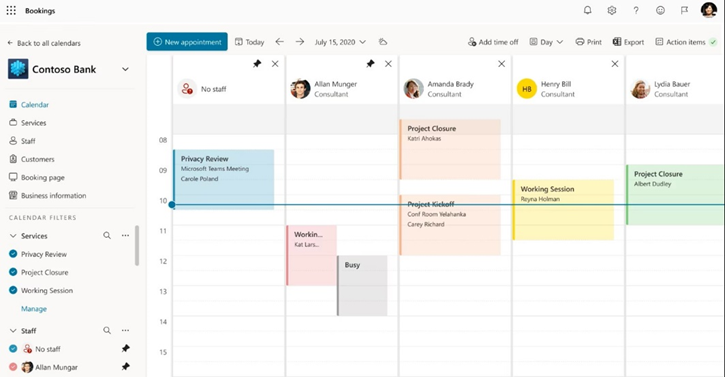
Creating a calendar in Booking
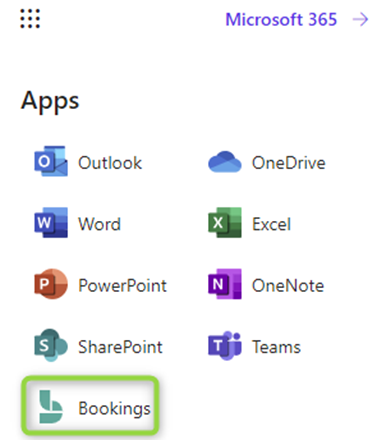
As a user, log in to office.Microsoft.com then choose the bookings app from the menu
By clicking on create you can add a shared booking page. As a next step, you can choose the calendar name, task type, and time. You can now set up a service. This setup allows the user to access the booking page. They will be capable of scheduling this service for the Bookings calendar.
You can create different services as needed, these services will be available to users who try to make a booking.
Now in the last step of the wizard you can choose who can book these types of appointments
After creation you will see the link to access the reservation, this link can be shared for the reservation.
Types of visualizations
Organizer view: An organizer is a user who creates meeting types. They share the booking page with other users. This lets you easily schedule meetings with them. A personal booking page where you can create meeting types that others can book with you. Custom meeting types allow you to decide when you want to meet. You can also choose how that meeting type is shared with others. You control if each meeting type is public to the scheduling page. Alternatively, it is private and can only be accessed by a select group of people. You can access the Bookings with me page through Outlook on the web. Once you’ve set up your page and publish it, you can share it with others. For example, you can add it to your Outlook signature.
Attendee view: An attendee is a user. They use the booking page to create a meeting. They can also join a meeting scheduled by an organizer. After the organizer shares the Bookings page with me with other users, these visitors will see the attendees view. If the host shared a link to the meeting, you’ll only be able to view the meeting
Types of Meetings
Public meetings can be viewed and scheduled by anyone with the link to the Bookings with me page. You are in control of who you share the link.
Private meetings can only be viewed by people who have the link for that meeting type. The difference between public meetings and private meetings is that private meetings can have different links. These links expire after 90 days. You can also set private links to expire after a one-time booking. When you enter the scheduling view for a private meeting, only the meeting type will be visible.
Book an appointment in the calendar
This part is related to what the user needs to do to book an appointment. When you log in to the link you can choose one of the services we have previously set up. Then you can choose the time to make the appointment.
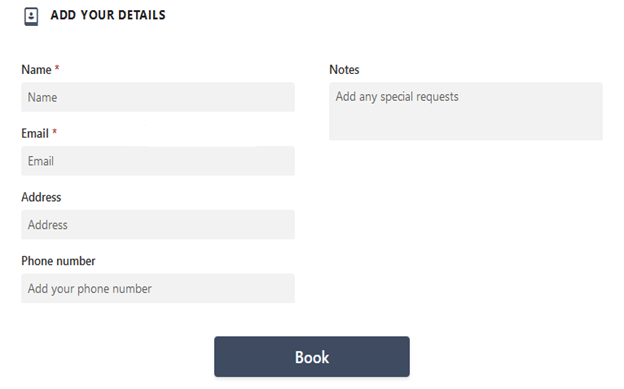
The User must enter the name and email. A confirmation email will be sent shortly after. The user will then be able to add the appointment to their personal calendar.
Operation and safety settings
Use the settings in the Microsoft 365 admin center under Settings ->Organization settings ->Bookings. Control who can use Bookings. Decide what information is shared. Decide whether staff need approval before they are added to a booking calendar. Apply naming policies.
- You can set up Bookings so that only users in your organization can book appointments.
- You can control how your booking pages are shared on social networks. This setting can be found in the Microsoft 365 admin center under Settings ->Organization settings ->Bookings.
- Staff details, like contact information, will never be sent to customers via email or other communications.
- You can demand employees in your organization to opt-in. This must happen before free/busy information is shared through Bookings. It should also occur before it can be bookable through a booking page.
- You can apply naming policies in your organization for all calendars. When this setting is enabled, administrators can define prefix and suffix. If selected, these rules will apply across all calendars.
- Add custom prefix: When this setting is enabled, all new calendars will have a prefix string added. The string is defined as a prefix. An example is “Prfx_ContosoCalendar”.
- Add custom suffix: Allow this setting to append all new calendars with strings defined as a suffix. This is something like “ContosoCalendar_Sufx”.
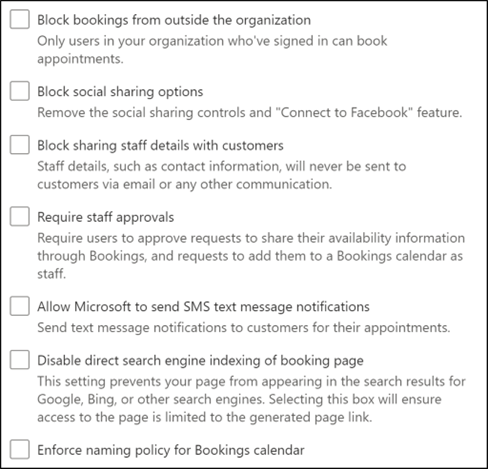
For compliance reasons, you not need to collect some customer information. If you select a check box for any of these options, these fields won’t be included in forms. These forms are displayed to customers.
General Information
- Bookings is an online service, so you don’t need to download anything. Simply navigate to the app chooser within the Microsoft 365 web experience.
- External users will only see the bookings calendar published online for the services, hours and staff chosen.
- You can embed the Bookings calendar on your site via an iFrame. The link embed code can be found on the Bookings page tab within the Bookings app.
- You can add your staff with any email. They will still get the email confirmation and calendar invitation when someone books an appointment with them.
- You can create and manage multiple Bookings calendars with one account. You can switch between them by using the cursor next to your business name in the Bookings web app.
- Each new Bookings calendar creates a corresponding mailbox in Exchange. It also creates a related entry in Azure Active Directory (Azure AD). The entry is listed as an unlicensed user.
- To remove a Bookings calendar, you must remove the associated mailbox in Exchange.
- The only people who can access the bookings calendars you create (via the web app) are those added as personal. They must be in an Admin or Viewer role. Tenant admins will be capable to see a list of all Bookings mailboxes in Exchange and Azure AD.
- Online meetings are available within Bookings when using Microsoft Teams clients.
- A setting called Maximum Lead Time determines the furthest in advance (measured in days) that a reservation can be made. The minimum lead time and the maximum lead time must be at least 24 hours apart. The minimum lead time is the minimum lead time, in hours, for bookings and cancellations. The maximum lead time can be set to one day if the minimum lead time is set to 0 hours. In this case, a customer can cancel a booking up to the start time. Customers can only schedule bookings if the appointment is within the next day.
- All hours are in the business time zone (local time zone) by default. Any setting you set up for a Bookings calendar, like working hours, will be in this time zone. The Self-service page has the ability to view all appointment times in the end user’s time zone.
- The booking confirmation is sent to both the service provider’s inbox and the external user’s inbox. The confirmation email includes an attached *.ics file, which can then be added to the user’s calendar with all relevant appointment details.
- There is a group booking feature that allows multiple people to book the same appointment at the same time.
- All Bookings staff assigned to the Admin role can download tab-separated values (. TSV) with all bookings made in the last 120 days. TSV module from the Home tab of the Bookings page.
- You can create separate calendars for each service.
- The ability for users to select specific staff members can be removed completely. Uncheck the choice to allow customers to choose a specific person for the booking. You can do this from the Reservation page or the Services section. Bookings will automatically assign a randomly available staff member to the booking, based on staff availability.
- Each bookings calendar is maintained independently. There is no consolidated view available, except for the search drop-down list after clicking the cursor on the home page.
- Access to the Bookings web app is authenticated using regular Azure Active Directory (Azure AD) authentication. The self-service booking page can be made available to everyone with the link to the web page. But, if you select the Require a Microsoft 365 or Office 365 account from my organization for reservation setting, the page will have restrictions. It will be limited to use only within your Microsoft 365 tenant. This restriction uses Azure AD authentication.
- You can define to which e-mail the customer sends replies.
Bookings with me
Users can book with me to schedule a meeting or appointment with you. This is done through a personal scheduling page. It integrates with Outlook calendar free/busy information. You can create custom meeting types to share with others. This allows them to easily schedule their time based on availability and preferences.
You get an email confirmation. Attendees can update or cancel meetings scheduled with you from the Bookings with me page.
Booking with me is ideal for companies, small businesses, and education users. It helps them schedule 1:1 meetings with those outside and within their organizations.
